How to Scrape Images from a Website With Python
Flipnode on Jun 06 2023

In our previous installment, we provided a comprehensive guide on scraping text-based data using Python. We covered everything from setting up Python and the necessary libraries to coding a basic web scraper and saving the extracted data to a CSV file. In this second part, we will delve into the extraction of images from a website and demonstrate how to save them to a specified location.
Before proceeding further, we highly recommend reading our article titled "Python Web Scraping Tutorial: Step-By-Step." Familiarizing yourself with the process of building a basic data extraction tool will greatly facilitate the creation of a Python image data scraper. Moreover, we will leverage portions of the previously written code as a basis for downloading image links. Throughout this tutorial, we will explore the usage of both Selenium and the requests library for educational purposes.
1. Install the prerequisites
In the previous web scraper tutorial, we explored the usage of various libraries like Beautiful Soup, Selenium, and pandas to extract and save data into a CSV file. Now, we will extend those steps to extract image URLs from a website.
However, simply collecting image URLs in a list is not sufficient. To complete the process, we will need to employ additional packages that allow us to retrieve the content of the URL, convert it into an image object, and save it to a specified location. The Pillow and requests libraries will assist us in accomplishing these tasks.
If you haven't followed the previous tutorial, start by opening your terminal and installing the following libraries:
pip install beautifulsoup4 selenium pandas
Next, we need to install the additional libraries required for image processing:
pip install Pillow requests
The Pillow library will handle image processing, while the requests library will handle sending HTTP requests.
Furthermore, we will utilize built-in Python packages such as io, pathlib, and hashlib to download images from a website and store them in a designated folder.
2. Inspect your target
To illustrate the process, we will utilize eBay's product listing page with the search keyword "laptop". Below is a depiction of the listing page, accompanied by its corresponding HTML source:
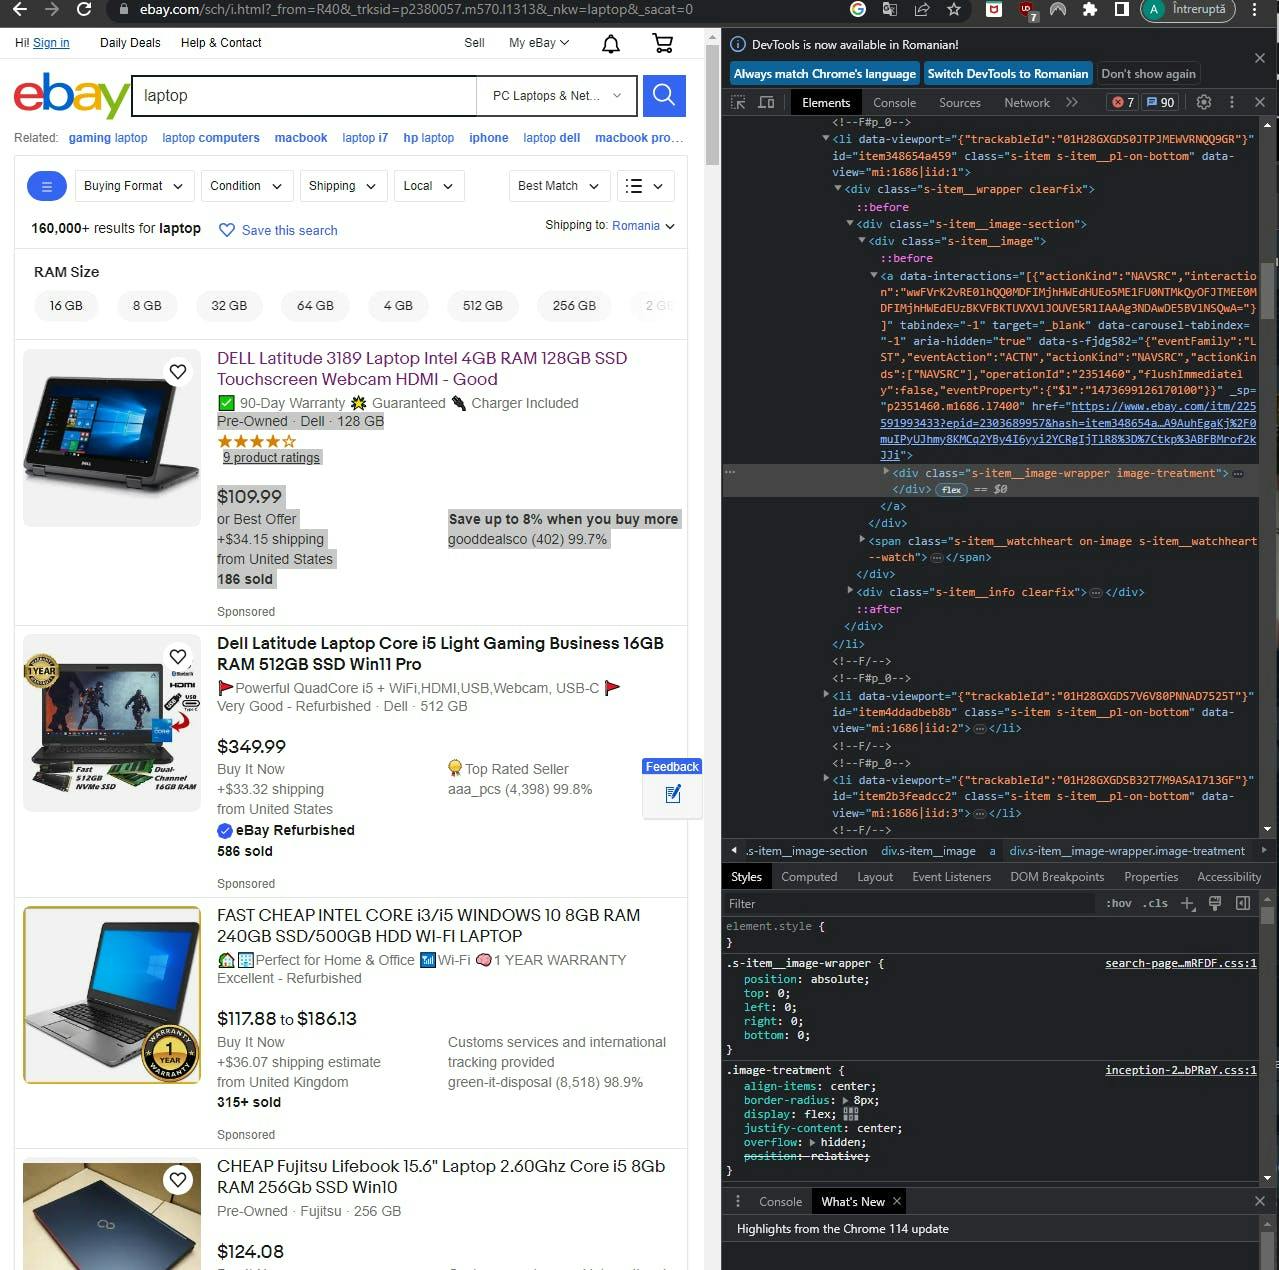
It's worth noting that each image in the HTML source of the page is contained within a div element with the class "s-item__image-wrapper image-treatment". Moreover, the images themselves are enclosed within img tags, with the source URL specified in the src attribute.
3. Launch the WebDriver to open a target URL
To start the data extraction process, you'll need to import the necessary Python packages. You can use the following code as a reference:
import pandas as pd
from bs4 import BeautifulSoup
from selenium import webdriver

# Specify the preferred browser for WebDriver (e.g., Chrome)
driver = webdriver.Chrome()

# Provide the URL from which you want to scrape image links
driver.get("https://www.ebay.com/sch/i.html?_from=R40&_trksid=p2334524.m570.l1313&_nkw=laptop&_sacat=0&LH_TitleDesc=0&_osacat=0&_odkw=laptop")

# Create an empty list to store the results
results = []

# Get the page source
content = driver.page_source

# Parse the page source using Beautiful Soup
soup = BeautifulSoup(content)
If you have saved the executable browser driver in a custom location, you can specify the directory in the executable_path parameter like this:
driver = webdriver.Chrome(executable_path="/path/to/webdriver/executable")
This ensures that the correct browser driver is used for WebDriver.
3. Extract image URLs with the Beautiful Soup library
In the previous tutorial, we performed actions without defining any functions. However, defining functions can be a valuable tool for any project. Let's move our URL scraper into a defined function. We will reuse the code from the Python Web Scraping Tutorial: Step-by-Step article and modify it to extract full URLs.
Before:
for a in soup.findAll(attrs={'class': 'class'}):
    name = a.find('a')
    if name not in results:
        results.append(name.text)
After:
def parse_image_urls(classes, location, source):
    for a in soup.findAll(attrs={'class': classes}):
        name = a.find(location)
        if name not in results:
            results.append(name.get(source))
Note that the code now appends the URLs using the get() function with an additional parameter source. This parameter indicates the field on the website where the image links are stored, which in our case is the src attribute of the img tag.
Based on the information from the previous section, where we identified the classes, locations, and sources of the images, you can call your newly defined function as follows:
parse_image_urls("s-item__image-wrapper image-treatment", "img", "src")Your updated code should now look something like this:
import pandas as pd
from bs4 import BeautifulSoup
from selenium import webdriver

driver = webdriver.Chrome()
driver.get("https://www.ebay.com/sch/i.html?_from=R40&_trksid=p2334524.m570.l1313&_nkw=laptop&_sacat=0&LH_TitleDesc=0&_osacat=0&_odkw=laptop")
results = []
content = driver.page_source
soup = BeautifulSoup(content)

def parse_image_urls(classes, location, source):
    for a in soup.findAll(attrs={'class': classes}):
        name = a.find(location)
        if name not in results:
            results.append(name.get(source))

parse_image_urls("s-item__image-wrapper image-treatment", "img", "src")
4. Save the URLs to a CSV file
Exporting the data into a CSV file is highly beneficial as it allows for easy inspection and identification of any potential semantic errors. To accomplish this, you can utilize the pandas library and include the following lines in your code:
df = pd.DataFrame({"links": results})
df.to_csv("links.csv", index=False, encoding="utf-8")
By executing the code, you will generate the "links.csv" file in the current directory.
5. Extract images
Assuming you didn't encounter any issues in the previous section, you can proceed with this section to download images from a website.
The requests library can be employed to retrieve the content stored in the image URL. The following code snippet accomplishes this using a for loop iterating over the results list:
import requests
for url in results:
    # Store the content from the URL in a variable
    image_content = requests.get(url).content
Next, utilize the io library to create a byte object out of the image_content and save the data in a new variable:
import io
# Create a byte object out of image_content and store it in the variable image_file
image_file = io.BytesIO(image_content)
At this point, the image_file variable represents a Python object. To convert it into an RGB image, you need to utilize the Pillow library:
from PIL import Image
# Use Pillow to convert the Python object to an RGB image
image = Image.open(image_file).convert("RGB")
However, the code is not yet complete. You need to determine a location to store the image data. Let's create a folder named "Test":
from pathlib import Path
import hashlib
# Set the file_path variable to point to your desired directory
# Create a file based on the sha1 hash of 'image_content'
# Use .hexdigest() to convert it to a string
file_path = Path("/path/to/test", hashlib.sha1(image_content).hexdigest()[:10] + ".png")
image.save(file_path, "PNG", quality=80)
By executing the code, the image will be saved as a PNG file in the specified directory.
6. Complete source code
Let's combine all the previous steps and observe how it works. Note that the pandas library is included in the code below but is grayed out as it is not used. We have kept it for convenience. Feel free to use it if you want to view or double-check the outputs.
import hashlib
import io
from pathlib import Path
import pandas as pd
import requests
from bs4 import BeautifulSoup
from PIL import Image
from selenium import webdriver

driver = webdriver.Chrome()
driver.get("https://www.ebay.com/sch/i.html?_from=R40&_trksid=p2334524.m570.l1313&_nkw=laptop&_sacat=0&LH_TitleDesc=0&_osacat=0&_odkw=laptop")
driver.execute_script("window.scrollTo(0, document.body.scrollHeight);")
results = []
content = driver.page_source
soup = BeautifulSoup(content)

def get_image_urls(classes, location, source):
    results = []
    for a in soup.findAll(attrs={"class": classes}):
        name = a.find(location)
        if name not in results:
            results.append(name.get(source))
    return results

driver.quit()
if __name__ == "__main__":
    returned_results = get_image_urls("s-item__image-wrapper image-treatment", "img", "src")
    for url in returned_results:
        try:
            image_content = requests.get(url).content
            image_file = io.BytesIO(image_content)
            image = Image.open(image_file).convert("RGB")
            file_path = Path("/path/to/test", hashlib.sha1(image_content).hexdigest()[:10] + ".png")
            image.save(file_path, "PNG", quality=80)
        except requests.exceptions.HTTPError:
            print("403 Forbidden Error: Unable to download image from URL:", url)
For efficiency, it is recommended to quit the WebDriver using driver.quit() after retrieving the URL list. You no longer need the browser as everything is stored locally.
When running the code, you may encounter one of two results:
- Images will be saved in the folder you have chosen by defining the file_path variable.
- Python will output a 403 Forbidden Error if it is unable to download an image from a specific URL. The URL causing the error will be printed in the console.
You are likely to encounter the second result when web scraping a website with strict anti-bot measures, as the 403 Forbidden Error indicates that your request has been denied by the target site. Fixing this issue may require some additional steps, although in some cases it can be more challenging.
One way to address this is by customizing the user agent used in the requests library. By default, the requests library assigns a user agent in the format 'python-requests/version.number', such as 'python-requests/2.31.0'. Some web services may block requests with this user agent as it indicates the use of the requests library. Thankfully, the requests library allows you to assign a custom user agent (or even a complete header) of your choice:
image_content = requests.get(b, headers={'User-agent': 'Mozilla/5.0 (Windows NT 10.0; Win64; x64) AppleWebKit/537.36 (KHTML, like Gecko) Chrome/113.0.0.0 Safari/537.36'}).contentAdding a custom user agent will often be sufficient in most cases. However, there are more complex situations where servers may check other parts of the HTTP header to verify the authenticity of the user. In such cases, additional measures may be required to bypass these checks.
Clean up the code with defined functions
To improve the readability and reusability of your code, you can organize everything into defined functions. Here's the revised code:
import io
from pathlib import Path
import hashlib
import pandas as pd
import requests
from bs4 import BeautifulSoup
from PIL import Image
from selenium import webdriver

def get_content_from_url(url):
    driver = webdriver.Chrome()
    driver.get(url)
    driver.execute_script("window.scrollTo(0, document.body.scrollHeight);")
    page_content = driver.page_source
    driver.quit()
    return page_content

def parse_image_urls(content, classes, location, source):
    soup = BeautifulSoup(content)
    results = []
    for a in soup.findAll(attrs={"class": classes}):
        name = a.find(location)
        if name not in results:
            results.append(name.get(source))
    return results

def save_urls_to_csv(image_urls):
    df = pd.DataFrame({"links": image_urls})
    df.to_csv("links.csv", index=False, encoding="utf-8")

def get_and_save_image_to_file(image_url, output_dir):
    response = requests.get(image_url, headers={"User-agent": "Mozilla/5.0 (Windows NT 10.0; Win64; x64) AppleWebKit/537.36 (KHTML, like Gecko) Chrome/113.0.0.0 Safari/537.36"})
    image_content = response.content
    image_file = io.BytesIO(image_content)
    image = Image.open(image_file).convert("RGB")
    filename = hashlib.sha1(image_content).hexdigest()[:10] + ".png"
    file_path = output_dir / filename
    image.save(file_path, "PNG", quality=80)

def main():
    url = "https://www.ebay.com/sch/i.html?_from=R40&_trksid=p2334524.m570.l1313&_nkw=laptop&_sacat=0&LH_TitleDesc=0&_osacat=0&_odkw=laptop"
    content = get_content_from_url(url)
    image_urls = parse_image_urls(content=content, classes="s-item__image-wrapper image-treatment", location="img", source="src")
    save_urls_to_csv(image_urls)

    for image_url in image_urls:
        get_and_save_image_to_file(image_url, output_dir=Path("/path/to/test"))

if __name__ == "__main__":
    main()
Now, everything is organized within clearly defined functions and can be easily called when imported. When executed as a main file, it will run the main() function as before.
Wrapping up
With the provided code, you should now have the ability to perform fundamental image web scraping tasks, including downloading multiple images from a website simultaneously. There are numerous ways to enhance an image scraper, many of which were discussed in the previous section. We suggest reviewing our Python Requests article to familiarize yourself with the library used in this tutorial. Additionally, our blog offers further information on getting started with data acquisition.