Puppeteer vs Selenium: Which to Choose
Flipnode on Apr 11 2023
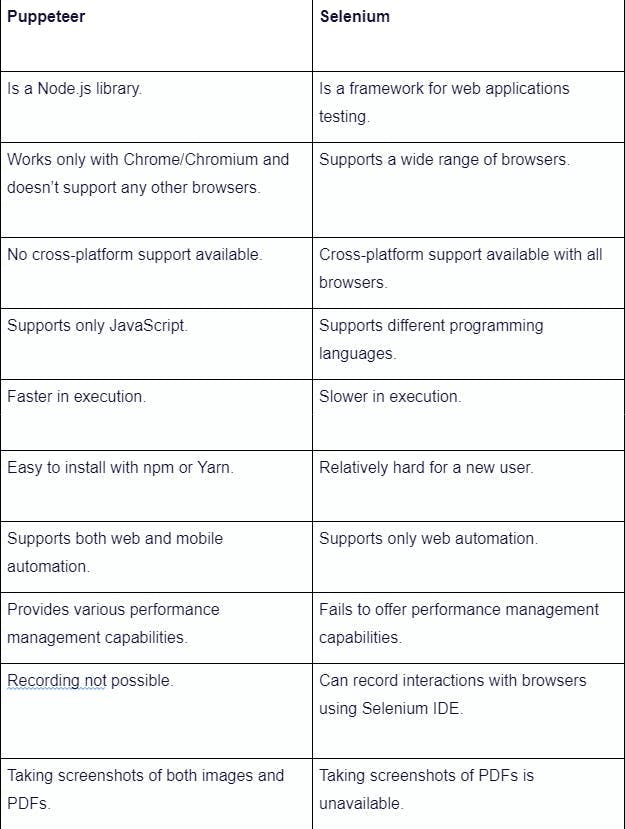
Puppeteer and Selenium are renowned open-source tools primarily utilized for browser automation and testing purposes. Despite its recent release, Puppeteer has garnered praise from developers due to its beneficial functionalities and outstanding performance. Meanwhile, Selenium is a well-established framework dating back to 2004, maintaining its position as a prominent industry leader for web automation. Supporting various programming languages and platforms, it has proven to be a versatile choice for developers.
In this article, we will delve into a comprehensive comparison between these two frameworks to help you make an informed decision on which best suits your needs.
Main features and use cases
Puppeteer
Primarily, Puppeteer is a Node.js library that enables the creation of automated testing environments. Its development was spearheaded by Google, with the aim of providing a high-level API to govern Chrome and Chromium via the DevTools Protocol.
In contrast to Selenium's support for a variety of programming languages, Puppeteer's focus lies in providing a specific set of control structures exclusively for JavaScript. It functions as a remote control library for Chrome, rather than striving to provide an extensive experience for developers.
Puppeteer is often utilized for a range of tasks:
- Including testing Chrome extensions
- Generating screenshots and PDFs for UI testing
- Executing tests on the latest Chromium versions
- Automating manual testing processes such as form submissions and keyboard inputs
- Web scraping
Selenium
When compared to Puppeteer, Selenium is a testing library that surpasses its counterpart in terms of browser compatibility. Selenium can not only support Chrome and Chromium, but also Firefox, Safari, Opera, and Microsoft Edge. Moreover, Selenium scripts can be written using a variety of programming languages such as JavaScript, Ruby, C#, Java, and Python. This allows developers to conduct comprehensive tests in their preferred languages and target multiple browsers using a single tool.
Additionally, Selenium boasts a range of components such as Selenium WebDriver, Selenium IDE, and Selenium Grid. These components significantly enhance the capabilities of the library, enabling users to fulfill a diverse range of testing requirements.
Selenium is often used in the following cases:
The common Selenium use cases include:
- Web performance testing.
- Web application testing.
- Automation testing.
- Performance testing.
- Data scraping
Advantages and disadvantages
In order to determine the most suitable tool for your particular activities, it is crucial to meticulously evaluate the advantages and disadvantages of each option.
As such, in this section, we will examine a comprehensive breakdown of the primary pros and cons of both Puppeteer and Selenium.
Puppeteer
Advantages:
- Puppeteer offers access to the DevTools protocol and the capability to manage Chrome, one of the world's most widely used browsers.
- Despite the limitation of only supporting one browser and one language (JavaScript), this is actually beneficial as it allows Puppeteer to perform at an exceptional speed, surpassing Selenium.
- Puppeteer also has fewer dependencies as it doesn't require separate maintenance of browser drivers, resulting in a simpler and more streamlined testing process.
- Furthermore, Puppeteer offers an array of useful performance management features such as taking screenshots and recording load performance.
Disadvantages:
- Has support for only one programming language - Javascript
- For the moment only supports Chrome
Selenium
Advantages:
- Selenium aims to provide support for an extensive range of browsers, platforms, and programming languages.
- It boasts a suite of built-in tools, including WebDriver, IDE, and Grid, which facilitate the creation of a comprehensive testing and automation framework.
- Selenium also offers direct integrations with CI/CD, enhancing its capabilities and ensuring seamless integration with the development pipeline.
Disadvantages:
- Selenium's installation process is more complex due to its broad support of multiple platforms, languages, and browsers.
- In contrast to Puppeteer, Selenium does not offer a diverse range of performance management features.
- Additionally, Selenium has a steep learning curve that requires time and effort to master.
Differences in setup and web scraping
In this section, we will compare these two tools by analyzing the fundamental differences in terms of environment setup and web scraping efficiency using Node.js.
Installation
Both Puppeteer and Selenium have straightforward installation processes. However, the main difference lies in the prerequisite libraries. Puppeteer users can install it easily using a simple npm command, whereas Selenium users need to follow language-specific instructions.
Puppeteer
npm install puppeteer
Selenium
npm install selenium-webdriver

npm install chromedriver
Browser control and web scraping
Both tools enable programmatic control of web browsers, making it possible to scrape dynamic content from targeted web pages. Let's explore the essential code differences between them for launching a headless Chrome instance, navigating it to a specific web page, waiting for specific dynamic content to load, and scraping the page.
For this demonstration, we will be scraping http://quotes.toscrape.com/js/. This is a dynamic web page that loads all the quotes dynamically through the relevant JavaScript file. The JavaScript file renders quotes in <DIV> elements, all of which have a quote class.
1. Dependencies and setting the target
Puppeteer
const puppeteer = require('puppeteer');

const url = 'http://quotes.toscrape.com/js/'; \
Selenium
const { Builder, By, Key, until } = require('selenium-webdriver');

const chrome = require('selenium-webdriver/chrome');

const url = 'http://quotes.toscrape.com/js/';
Since Selenium supports multiple browsers, it requires importing specific browser drivers (in our case, Chrome drivers) along with the webdriver. However, Puppeteer has Chrome driver implicitly available.
2. Launching a headless chrome instance and navigating to the target URL
Puppeteer
const headlessBrowser = await puppeteer.launch({ headless: true });

const newTab = await headlessBrowser.newPage();

await newTab.goto(url);
Selenium
let driver = await new Builder().forBrowser('chrome') .setChromeOptions(new chrome.Options().headless()).build();

await driver.get(url);
To launch the browser instance in puppeteer, an awaitable launch() method is used, and a new browser tab can be created using the newpage() method. after that, the tab can be navigated to any given url using the goto() method.
in contrast, selenium uses the builder() constructor to build a new Biuilder instance with specific options. the build() method creates and returns a new instance of the webdriver session.
3. Waiting for dynamic content to load
In the following code, we will compare the differences between Puppeteer and Selenium in waiting for specific JavaScript content to load. Both tools have different approaches for waiting for the <Div> element with the quote class to load.
Puppeteer
await newTab.waitForSelector('.quote');Selenium
await driver.wait(until.elementLocated(By.className('quote'))); When waiting for a specific element to load, Puppeteer uses the waitForSelector() method, whereas Selenium uses the wait() method along with the until property.
4. Scraping the quotes
The querySelectorAll() method in Puppeteer selects and returns all elements that match a specified CSS selector. In contrast, Selenium provides the findElements() method, which extracts relevant elements based on the specified By selectors.
Puppeteer
let quotes = await newTab.evaluate(() => {

    let allQuoteDivs = document.querySelectorAll(".quote");

    let quotesString= "";

    allQuoteDivs.forEach((quote) => {

        let qouteText = quote.querySelector(".text").innerHTML;

        quotesString += `${qouteText} \n`;

    });

     return quotesString;


});

console.log(quotes);
Selenium
let quotes = await driver.findElements(By.className('quote'));

let quotesString = "";

for (let quote of quotes) {

      let qouteText = await quote.findElement(By.className('text')). getText();

      quotesString += `${qouteText} \n`;

 }

 console.log(quotesString);
In the Puppeteer code, it is worth noting the use of the evaluate() method, which enables the execution of a function within the current page or tab context. This enables access and manipulation of elements in the Document Object Model (DOM) of the current page or tab, followed by returning a value as the output (in our case, quotesString).
5. Closing the browser
Puppeteer provides the close() method to terminate the browser instance, whereas Selenium offers the quit() method to end the browser instance and terminate the driver session.
Puppeteer
headlessBrowser.close();
Selenium
await driver.quit();
Puppeteer vs Selenium: Key differences
Which one should you choose?
By now, it's evident that Puppeteer and Selenium are both powerful tools with remarkable capabilities for testing automation. However, choosing one over the other depends on your specific needs or your organization's.
If you solely work with Chrome, Puppeteer is the optimal choice due to its high-level API, providing exceptional control over the browser, and its speed and focus, ensuring test setup efficiency. Additionally, as Puppeteer is more of a web automation tool than a testing library, it's more suitable for web crawling and scraping.
In contrast, if you need to support various browsers and programming languages, Selenium is the best option. Selenium WebDriver offers cross-browser support, allowing direct interaction with any browser, and extending the test scope without depending on external tools.
Wrapping up
The article provided an in-depth comparison between two widely used automation frameworks, Puppeteer and Selenium, highlighting their unique features and benefits. As a result, we hope that this guide will assist you in determining your specific needs and selecting the best tool for your upcoming projects.